A beautifully arranged charcuterie board is one of the easiest yet most impressive ways to entertain guests. Whether you’re hosting a dinner party, celebrating a holiday, or planning a casual gathering, a thoughtfully prepared board offers a variety of flavors and textures that appeal to everyone.
Learning how to make a charcuterie board is not complicated. With a few quality ingredients and simple presentation tips, you can create a visually stunning centerpiece that tastes as good as it looks.
What Is a Charcuterie Board?
The word “charcuterie” comes from French culinary tradition and originally referred to prepared meats such as salami, ham, and pâté. Today, charcuterie boards have evolved into versatile appetizer platters that include a variety of cured meats, cheeses, fruits, nuts, spreads, and crackers.
While traditional charcuterie focuses on meats, modern boards are highly customizable. You can design them for holidays, themed parties, or even dietary preferences like vegetarian options.
Step By Step Methods
Creating a charcuterie board becomes simple when you break the process into clear, manageable steps. Follow this step-by-step method to build a balanced, visually appealing board with confidence and ease.
Step 1: Choose Your Board or Platter
Start with a solid base. You can use:
-
A wooden cutting board
-
A marble slab
-
A large serving tray
-
A slate board
The size depends on how many guests you’re serving. For small gatherings (4–6 people), a medium board works well. For larger groups, consider using a large platter or multiple smaller boards.
Make sure the board is clean, dry, and large enough to prevent overcrowding.
Step 2: Select a Variety of Cheeses
Cheese is one of the highlights of any charcuterie board. Aim for 3–5 types of cheese with different textures and flavors:
-
Soft cheese (like brie or goat cheese)
-
Semi-soft cheese (such as Havarti)
-
Hard cheese (like aged cheddar or Parmigiano-Reggiano)
-
Blue cheese for bold flavor
Place the cheeses on the board first, spacing them out evenly. This creates anchor points for the rest of the ingredients.
Pro Tip: Let cheese sit at room temperature for about 30 minutes before serving for better flavor and texture.
Step 3: Add Cured Meats
Traditional charcuterie includes a variety of cured meats. Popular options include:
-
Prosciutto
-
Salami
-
Chorizo
-
Capicola
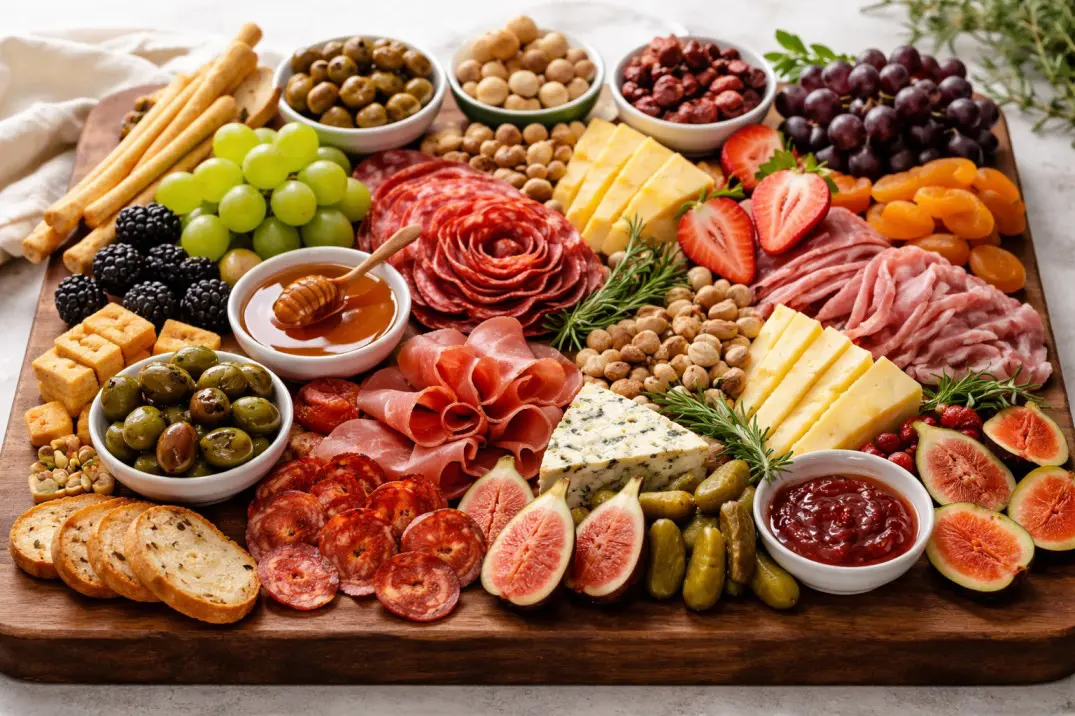
Fold or roll the meats for visual appeal. For example, fold slices of prosciutto into loose ribbons or create small salami “roses” for a decorative touch.
Arrange meats near the cheeses that pair well together. For example, salty prosciutto pairs beautifully with creamy brie.
Step 4: Include Fresh and Dried Fruits
Fruits add sweetness, freshness, and color contrast to your board. Popular choices include:
-
Grapes
-
Strawberries
-
Apple slices
-
Pear slices
-
Dried apricots
-
Figs
Place fruits in small clusters around the board. They fill gaps and make the presentation look abundant and inviting.
If using apple or pear slices, lightly toss them in lemon juice to prevent browning.
Step 5: Add Crunchy Elements
Crunchy items provide texture and balance. Consider including:
Arrange crackers in neat rows or small stacks. Nuts can be placed directly on the board or in small bowls for easy serving.
Make sure there are enough crackers and bread to support all the toppings.
Step 6: Incorporate Spreads and Extras
Small additions can elevate your charcuterie board from simple to spectacular. Try adding:
-
Honey
-
Fruit preserves
-
Mustard
-
Olives
-
Pickles
-
Roasted red peppers
Use small ramekins or bowls for spreads and wet ingredients to keep the board tidy. These items add tangy, sweet, or savory notes that enhance the overall flavor experience.
For example, drizzle honey over blue cheese or pair fig jam with aged cheddar for a delicious combination.
Step 7: Arrange with Balance and Style
Once your main components are placed, fill in empty spaces with smaller ingredients like nuts, dried fruit, or olives. Aim for a full, abundant look without overcrowding.
Tips for beautiful presentation:
-
Vary colors for visual contrast
-
Mix textures (soft, crunchy, creamy)
-
Keep ingredients close but not overlapping excessively
-
Add fresh herbs like rosemary or thyme for garnish
A well-balanced board looks natural rather than overly structured.
Step 8: Provide Serving Tools
Don’t forget practical details. Include:
Each cheese should ideally have its own knife to avoid mixing flavors.
How Much Food Do You Need?
A general guideline is about 2–3 ounces of meat and cheese per person if serving as an appetizer. If the charcuterie board is the main attraction, increase the quantity to 4–5 ounces per person.
It’s better to slightly overestimate than run out too quickly.
Creative Variations
Once you master the basics, you can experiment with themed boards:
-
Holiday board with festive fruits and seasonal treats
-
Dessert charcuterie board with chocolates and cookies
-
Breakfast board with pastries and fresh berries
-
Vegetarian board featuring roasted vegetables and plant-based cheeses
The possibilities are endless, and you can adapt your board to any occasion.
Final Thoughts
Learning how to make a charcuterie board is all about balance, variety, and presentation. Start with quality cheeses and meats, then layer in fruits, crunchy elements, and flavorful extras. Arrange everything thoughtfully, and don’t be afraid to get creative.
With a little practice, you’ll be able to create a stunning charcuterie board that impresses guests and makes any gathering feel special.